Sunday, 30 June 2019

Back to Pink!

Good evening,

I still have plenty of samples so I am keeping up with daily blogging!  Today was the workshop I do in Bawburgh and last Sunday it was the one in Great Blakenham.  I have been doing these for years now and many of the ladies have stuck with me since the very first one!  I so enjoy meeting with everyone, it is good to chat and share crafty ideas (and other ideas, for that matter!!)  I provide the original idea then everyone puts their own spin on it (That is a polite way of saying that no-one does what I tell them!!) 
Thank you so much to you lovely ladies for supporting the workshops and making them such fun to do.
These are the cards we did.... Pink is actually one of my favourite colours and I realised I hadn't been using so much recently, so I have rectified that....
We used a selection of stencils and stamp sets 200 Hope and 210 Background Mash Up both by Tracy Evans


Thank you for looking!
Janet xxx

Saturday, 29 June 2019

Flowers and Gears

Good evening!

Today was one of those days when you think it's all going well, then you make a basic school boy error......

I had finished most of the card and was just sticking it to the base.  I use double-sided tape and had taken the back off so it was all sticky.  I realised that I hadn't got any base card out, so I popped the card sticky side down on my mat while I went to get the base card... did you spot the error there???

I managed to get the card off the mat with no damage to the card (thank goodness!) but it left lots of sticky tape behind on the mat, which I promptly forgot about until I couldn't get another project I was working on off the mat!!!

Some days I really think I am getting the hang of this lark, then other days I do stuff like that!

Stamp set 195 Flowers and Gears by Olga 
I made this one a while ago now and can't quite remember what I did..but it was something like this...
I blended ink on the card and spritzed and blotted for the background colour, then stamped the smaller gears from the set in the same colours and stamped the bigger gears in black
I stamped the gorgeous peonies separately, coloured and cut out (I know, Veronica!  More cutting out - I think I am ill!!)
I stamped and coloured the leaves straight on the card (you can have too much cutting out!!)
added the greeting and some screwhead brads and a few gems.
Thanks so much for dropping in! 
Janet xxx

Friday, 28 June 2019

Floral scene

Good evening,

I hope you aren't getting fed up of me but I still have loads of samples to show you.....

Tonight's is a clean and simple card made using the delightful Flourishing Vase stamp set by Tracy and Abs stencil #30

I have just posted this card on the AALL and Create Fanatics page (well worth joining!) and had a lovely little conversation with Tracy.  I have only recently come to realise how important doing these tiny bits of art is to me.  It is not just a hobby, it is not just something I do, I have finally realised it is part of who I am!  That is quite a thing to realise!

So onto the card...
Stamp 213 Flourishing Vase by Tracy and Stencil 30 by Abs
For the background, I masked off the bottom part of the card, then inked the back of the stencil with distress inks (I vaguely used blue towards the top and green towards the bottom) I made sure the top of the stencil had ink but I wiped some away from the sides, then spritzed with water and pressed onto the card, making sure to cover with plenty of tissue to mop up any seepage.
Once dry, I stamped the flowers in place and coloured them.  I drew in a line along the bottom of the stems and added a few squiggles, then added some washi tape and stamped the sentiment!
Done!  Nice and easy....
Just a little note, the stems of the flowers can be bent slightly to change the shape of the flower

Thanks very much for visiting!
Janet xxx

Thursday, 27 June 2019

Kaitlin's ladies

Good evening,

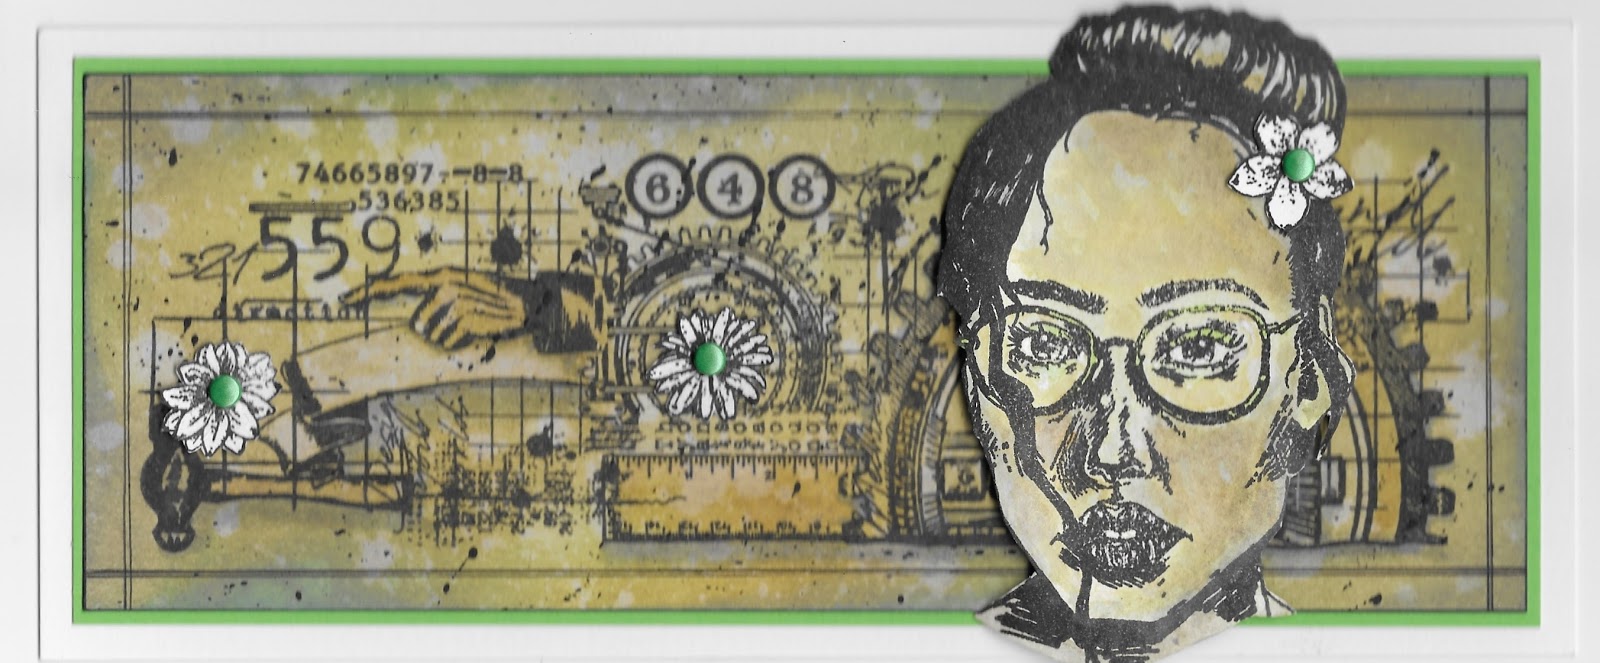
This evening I thought I would share two cards made using the lovely ladies by Kaitlin. I love these images...

Stamps 218 Flower Kido by Kaitlin and 202 Gears and Elements by Bipasha
Stamp 217 Bug by Kaitlin
I went a bit vintage with this one.  I liked the idea of mixing the two different types of image...
I did a vintagey background with distress oxides, stamped the gears and elements then coloured a few of the elements with darker and lighter shades to add a bit of interest
I stamped the lady on separate card and coloured her in matching tones, then cut her out.  I also stamped and cut out the flowers from the set and put them in place with green brads.  I gave the lady a bit of green eyeshadow to match!  (Is it just me, or does she look like a naughty secretary??)

For the second card, I blended some inks over the card then stamped the lady in place.  Avoiding the lady, I stamped the rest of the images from the set in matching tones all over the background and also used black to add the bugs
I did a bit of shading on the face and added some white highlights with a pen.  It all looked a bit dark, so I decided to stamp the sentiment in white paint over the background too.
I also stamped it in black and added to the card.
I love this sentiment, even though it doesn't apply to me - I would never make 99% angel!!
Thank you for visiting!
Janet xxx

Tuesday, 25 June 2019

For Him

Good evening everyone,

Ask me how much gardening I got done the other day - yep, none!!  I got a few phone calls and a visitor, then I had to pick up my car after its service, then it was raining etc, etc, so my poor garden is still looking a bit neglected!  Still, there is always next Saturday...

Here is another card made with the sexy man stamp by Bipasha.  I have never noticed before, but I am seeing men with this hairstyle all over the place now!

Stamp 916 For Him by Bipasha and 211 Count on You by Aida Stencil 30 by Abs
I placed the stencil on the card and brushed blue and brown ink over.  Keeping the stencil in place I drew all round it with a fine black pen and still with the stencil in place, stamp the numbers from the set Count on You by Aida.
Now for the fiddly bit, I went round and filled in all the bits where the numbers overlap. so the number on top is complete.  I then went round and added some shadow where the numbers overlap.
This takes a while, but it is the sort of thing I enjoy, I find it relaxing!
Once the background was done, I stamped and coloured the lovely man, cut him out and placed him on the card and added some washi tape.
(The little random blobs on the number 2 are not actually on the card, I have got something stuck to my scanner, which I didn't notice until I'd sent the cards off)

Thanks very much for dropping by
Janet xxxxx

Monday, 24 June 2019

The Rabbit Card

Good morning!

It is a lovely day here in rural Norfolk.  I have a rare day when I don't actually have any cards to make, so I am going to get out in the garden.  It is looking a bit neglected and needs some attention.  Also, I like being outside with the birds twittering away....

So on that theme, my card today features the cute (and one grumpy) rabbits by Olga.  These are such wonderful images, I love them!

Stamps 214 Bunnies by Olga and 210 Background Mash Up by Tracy
Stencils 77 Sunflower Power by Olga and 67 Broken Circles by Abs (and other stencils too!)

 I decided I wanted to use the border die and have the rabbits kind of 'coming out of their warrens'.
I chose a background I had made at a workshop with Abs (don't read this bit Abs!)  I loved the background I made by layering paint and stencils on a gelli plate and taking the print, but I knew I wasn't going to do a very good job with the project we were supposed to be doing,  so I kept this one back for later!
Lucky I did, because it was a perfect background for rabbits and carrots!
I cut a circle, then used the die to cut the slits for the rabbits.  I added a bit of ink to the edges of the cut just to make it stand out a little bit.
I did some stamping to add some interest to the background and added some washi tape under each slit.
The rabbits were all stamped on separate card, coloured and cut out - yes I cut out all of them!  including the fiddly bits round the leafy tops - people who know me will know what a miracle that is!  but it was the only way for the card to work, so it had to be done!  It was worth it though because once I had put them in place, I loved the finished result.  I was going to just stick to the three with the carrots, but decided that the grumpy rabbit was too nice to miss out, so I added him too!

Thank you so much for visiting, I hope you all have a lovely day - I'm off to find my secateurs!
Janet xxx

Sunday, 23 June 2019

Tracy's Flowers

Good evening,

Today I have been prepping for a workshop tomorrow.  Just at the last minute, I was looking for one of the stencils I wanted to use and I hunted and hunted looked everywhere at least three times, couldn't find it....eventually found it down the back  of the sofa - don't know why I didn't look there first!!   Why was it down the back of the sofa??  I have a bit of a habit of carrying stuff round with me and leaving it in random places because I get distracted and start doing another job instead of finishing the one I am supposed to be doing.  I must have rested the stencil on the cushion and moved onto something else, then it fell down when someone sat on the sofa.
Anyway, I found it, that's the main thing!

On to the cards..
These are two cards I've made with Tracy's lovely Eclectic Stems stamp set, this is such a lovely set, the flowers are really nice to use and there are some good sentiments too.  I used the fabulous Background Mash Up stamp too, this is an amazing background stamp!

I added some ink to one side of the card, then stamped the numbers from Aida's set 211 Count on You.  I did some stencilling with my all time favourite Lotza Dotz and one of my other favourites, No. 6 both by Abs
I stamped the flower then stamped the head and leaf on a separate piece of card, coloured and cut out.
I used the Background Mash Up to add touches of text.
I added some texture paste and the sentiment, then stuck the flower and leaf over the top and finished with a bit of splattering and doodling.

For the second Card, I found a background I had previously done, and added some stamping with the Background Mash Up.  If I am honest, the background started quite big, but I kept going wrong and didn't like the way I'd positioned things, so I kept cutting it down, until I ended up with quite a small piece!  Anyway, I got there in the end.  I stamped and coloured the flower head separately, then added it over the stamped image at the end.
The edge at the bottom is done with a wonderful border die from DIY & Cie It just adds a nice little finishing touch.  (I love them and have been using them a lot!)
I also added some circles with the distress crayons a la Abs.

Thanks very much for visiting!  Janet xxx